Wednesday, August 17, 2016

Homemade Dinner Rolls

Do you love homemade dinner rolls?  When I cook a meal for my family or for a large holiday gathering, I love to make fresh baked homemade dinner rolls.   I love to watch everyone enjoy the freshly baked bread aroma when they enter the home.  It pleases me to see the expressions when they take the first bite of the warm roll with butter or apple butter on it.  Homemade dinner rolls are a beautiful and tasty enhancement to the delicious meal you have before them.

My cousin shared a nice family recipe which I am sharing with you.  Now, you, too, can feed your family some great freshly baked homemade dinner rolls.  Please note that this recipe will yield more than four dozen.

4 Tbps shortening
¾ C granulated sugar
1 ¼ tsp salt
2 eggs
2 C warm milk
1 C water
3 Pkgs of dry yeast (1 strip or 1 cake)
7 C flour

Cream shortening, sugar, salt and eggs.
Separately, add yeast to warm water, stir and let set. 
The next step is to heat the milk for one to two minutes in microwave. 
 
Add flour and knead the dough well. 
Be sure to mix well.
Add the shortening mixture, and yeast mixture to the warm milk.

Place the dough in a greased bowl and let it rise double in size.  Form the dough into rolls, and let rise and bake at 350 degrees for about 8-10 minutes.


Helpful Hints: 

            Warm Water:  Be sure your water is warm to the tough, a few degrees about room
             temperature and warm enough to dissolve the yeast.  Be careful that the water is not hot and              kills the active yeast which would causing the dough to NOT raise. 

             Warm Milk:  Same as the water.  Be sure that it is warm, not boiling hot, as it could kill
            the rising action of the yeast.

 If you have comments or questions, you may place them in the comment section below.  We also welcome opportunities to share your recipes with our readers.  If you wish to share your recipes, you can email them to JLMarkerKitchens@gmail.com or in the comment section below. 

JLMarkerKitchens.com

Tuesday, August 9, 2016

Did you know .... Kitchen Helpful Hints Part I


Sometimes we find the coolest and neatest information online or hear great kitchen helpful hints from our mothers, family and friends.  Here are just a few that I've come across.  Feel free to share these tips with your kids, or other family and friends.

 Did you know.....

1.      You should keep (store) your spices in cool, dark, places and not keep them above your stove.  The reason for this is because the humidity, light and heat will cause the herbs and spices to lose their flavor.


2.      If you are preparing a nice meal and/or dessert for a VIP (Very Important Person) like your boss, your pastor or similar, you may not want to make a new recipe.  They never seem to work out the first time.  Be sure you are creating a dinner that you know you have perfected before.


3.      To keep your pasta from getting mushy, be sure to cook it one (1) minute less than the package instructions and then finishing cooking it the rest of the way in the pan with sauce. 


4.      When you are cooking and realize that you need to add more oil to the pan, be sure to add it in a stream along the edges of the pan.  By doing so, by the time the oil gets to the food being prepared, the oil will be heated.


5.      Deep frying food is often times messy and doesn’t work the way you want, however, when placing the food in the cooking oil, you may want to hold each piece of food with long tongs as you add it to the oil. It should be held just below the oil’s service for a period of five (5) seconds before letting it go into the oil.  This will prevent the food item from sticking to the bottom of the pot or the other food in the oil.


There are more helpful hints where these came from and we will be sure to share in future “Did You Know…..Kitchen Help Hints” blogs in the near future. 

We welcome you to share your kitchen helpful hints with us in the comment section below.  We will recognize your submission in a future blog. 

JLMarkerKitchens.com


Tuesday, August 2, 2016

Watermelon Sticks and Slices

'Tis the season for watermelon.  Graduation parties, family reunions and summertime birthday celebrations often mean that watermelon will be included in the menu.  Whether by pot luck or by planned menu, you will find that watermelon slices will be sitting pretty on the table. 

How do you cut your watermelon?  There are some very simple ways and then again you can be very creative and carve the perfect design into the shell. 

Here are a few options from which to choose, but I have found that my favorite which is VERY EASY, is to create watermelon sticks rather than watermelon slices. 

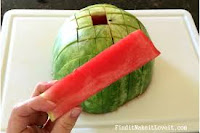
Make Watermelon Sticks  - perfect for kids and parties
You may want to view this video to the left showing the best way to cut watermelon sticks.  These are perfect for kids to handle.  Sometimes people just want a little piece that easy to eat.  These watermelon sticks are perfect for that, too. 

https://www.youtube.com/watch?v=7PLYOQbJgq0Watermelon ArtMaybe you want to try to be even more creative.  There are many videos and books out there to help you be the master at carving a watermelon and giving your guests a lot to talk about.  Carving a watermelon can be as easy or hard as you want it to be.  Check out the
video to the right and see what you can do. 

Come on, give it try! 

Tuesday, July 26, 2016

Red Raspberry Jelly Crescent Cookies

Here is a yummy treat that can be a bit habit-forming to eat.  It’s the Red Raspberry Jelly Crescent Cookies.  “I bet you can’t eat just one” of these.  When made properly, they are small and bite size.  They are like little “poppers” that you can pick up and pop right in your mouth. 

One bite, IF you can eat just one of these red raspberry jelly crescent cookies, can satisfy that sweet –tooth craving. 

The recipe below is one of my favorite homemade cookies for the holidays, however they can be made at any time of the year.  These Red Raspberry Jelly Crescent Cookies can be made for any event – weddings, baby showers, bridal showers, birthday parties, anniversaries or any time you want to make a special treat for your family. 

You can replace with strawberry, blueberry or any other fruit flavor that you desire, if raspberry is not your favorite flavor.

 
The ingredients needed for the Red Raspberry Jelly Crescent Cookies are as follows:

8 oz room temperature cream cheese
1 1/3 cups softened butter
2 2/3 cups flour

Mix the cream cheese, butter and flour.  Blend the ingredients well.  Separate the dough into five (5) dough balls.  Wrap the dough balls separately in plastic wrap, then refrigerate overnight.

Roll dough ball on lightly floured surface to form circle.  Cut into approximately twelve (12) wedges  (however, if you wish to have smaller, bite size cookies; you may wish to cut the dough ball in half before rolling to form a circle to make smaller wedges). 

Spread a thin coat of Red Raspberry Jelly (or your preferred flavor) on the rolled out dough circle – wedges.    Roll the wedges to the point and shape in crescent formation. 

Bake at 350 degrees on an ungreased cookie sheet for 10-15 minutes.  The bottoms should be lightly browned.   Cool them on a rack. 

After they are cooled, drizzle frosting on the cookies. 

The ingredients for the frosting is as follows:
 
1 cup confectioner sugar
4 tsp lemon juice

Blend these ingredients well and drizzle on the cookies.  

 
Helpful tips:

Butter should not be replaced with margarine. 

Be sure to refrigerate the dough overnight.  There is definitely the need for refrigeration-for a minimum of no less than 10-12 of refrigeration. 

When spreading the jelly on the rolled out dough, be sure that it a thin layer.  If you put too much jelly on the dough, it will squish out, baked out of the cookies and cause your cookies to stick to the pan and/or cooling rack. 

Do not drizzle the frosting on hot cookies.  They need to be cooled.  Otherwise, the icing will melt and run off of the cookies.

These Red Raspberry Jelly Crescent Cookies can be frozen for up to 3 months (sometimes longer, if package properly in a nicely sealed container.

Don’t leave them out on the counter unless you want them to disappear quickly, as each person passing by with “pop one” and before you know it, they are gone.  Enjoy!

 
JLMarkerKitchens.com 

Monday, July 18, 2016

Cream Cheese Pizza Dip

Want to serve the best enjoyed appetizer at the next party you attend?  I’m always looking for great ideas, that can be easy to prepare and easy to transport as well as easy to enjoy. 
 
Here is a great recipe for a Cream Cheese Pizza Dip that everyone will enjoy and will wish you had made more for the party. 

The ingredients required for this Cream Cheese Pizza Dip is as follows:

                8 oz of cream cheese, softened
                ¾ cup light mayonnaise
                1 cup shredded mozzarella cheese
                3 oz sliced pepperoni, chopped
                2 ripe plum tomatoes, chopped
                10 large black olives, chopped
                                                                            4 crusty Italian rolls – ½” pieces

 
Heat the oven to 350 degrees.  In a large bowl, mix together the cream cheese, mayonnaise, mozzarella cheese, pepperoni, tomatoes and olives.  Spoon into a 6 cup baking dish. 

Bake at 350 degrees for 30 minutes, until lightly browned and bubbly.  Allow to cool slightly.  Serve with the bread pieces for dipping. 

                                     *****************************************
I do make a few changes to this recipe which helps to make preparation and serving of the dish a little easier. 

First of all, I don’t always use the crusty Italian rolls, instead, I will by the Tostitos Dippers.  They don’t get stale as fast as the rolls.  They are in a bag ready to be served. 

Secondly, I often used regular mayonnaise or salad dressing (Miracle Whip) to give a little different taste. 

Finally, because some people don’t like to bite into a tomato or olive, and prefer a smooth texture dip, so I will chop them real fine or even puree them.  You can use a pizza sauce and use the smaller - tiny pepperoni so to save time on cutting up the pepperoni. 

I also like to lay a few pepperoni and black olives on the top as garnishing for decorative look. 

Share and enjoy at your next party. 

Wednesday, July 13, 2016

Pool Party and Summer Fun Ideas

It is summer time and it's a great time for you to be creative with your next pool party and have summer fun ideas with the snacks that you provide at your summer fun picnic or pool party.  You could be the nice and generous host or hostess and serve up regular snack likes chips, oreos and other purchased goodies.  However, think how much more fun it would be to serve up cute little snacks that provide entertainment and conversation.   You would be fun and exciting hostess!

Here are a few ideas:

Consider decorating your small sandwich cookies by using colored icing to create beach balls.  You can easily decorate a purchase cookie like the vanilla cream sandwich cookie or similar or, better yet, make your own sugar cookie, putting icing between two cookies to make a sandwich look.  Then decorate the top.  What Fun!


Here you can fill disposable wine glasses with blue jello and top with gummy fish candies to make it look like the fish in the water.  You can mix smaller gummies inside the jello as well. 
The beach scene is one that everyone will ask -- "how did you come up with such a cute idea"?  Using nutter butter sandwich cookies, you can ice them to look like flip flops.  Laying them on a bed of finely crush graham crackers and adding a few star shaped candies and other beach themed ideas will be a creative tray to be serve for all of your outdoor festivities. 


Be your creative self and enjoy.  If you have a great idea, we would love to share your ideas with our readers.  Feel free to comment below and give us your most creative ideas. 


One word of caution.....  People will love your ideas, your creativity and may request that you throw all of the parties or at minimum make all of the snacks for it.    

JLMarkerKitchens.com

Saturday, July 9, 2016

Strawberry Spinach Salad

Love strawberries?  Love a nice fresh salad?  Nothing better than a nice and refreshing salad that uses fresh ingredient from your garden.  Get yourself some fresh strawberries or other mixed berries, add some spinach leaves and other lettuce if you prefer, and stir in other vegetable such as onions, black olives for example.  Below is a very yummy strawberry spinach salad that you will absolutely love and enjoy.