Wednesday, August 24, 2016

Cauliflower Pizza Crust


Cauliflower, pale and unassuming, like its relatives, is a nutritional powerhouse.  It has only 25 calories per serving and delivers more than 75 percent of the recommended daily vitamin C, a good dose of dietary fiber.    You will also find vitamin K, potassium, magnesium, and antioxidants. 
 
Cauliflower can make a great substitute for mashed potatoes when you mash and mix with a little milk, butter and Greek yogurt. 

Consider making a roasted cauliflower soup.  Puree with chicken or vegetable stock and your choice of fresh herbs for this creamy dish. 

Raw or steamed cauliflower is mild-mannered, however, when roasted, it caramelizes into sweet nutty goodness.   There is so much you can use cauliflower for as a replacement for other higher calorie and/or carb foods. 

Have you ever made Cauliflower crust for your pizza.  Here is a great recipe to try.

1 large head of cauliflower
1 egg
½ cup parmesan cheese
1/3 cup goat cheese, softened
¼ tsp salt
¼ tsp black pepper
½ tsp Italian seasoning
Pizza toppings of your choice

Preheat oven to 400 degrees.  Cut cauliflower head into small florets.  Place on a parchment-lined rimmed baking dish.  Roast for approximately 15-20 minutes until lightly golden and very tender, tossing occasionally to prevent burning. 

Remove from oven, let cool until you can safely handle.  Finely chop, or pulse in a food processor, until the cauliflower is a rice-like consistency.  Place cauliflower “rice” in the middle of the clean thin cotton dishtowel or two layers of cheesecloth.  Wrap up the cauliflower in the towel and twist to squeeze out as much excess liquid as possible.  (this is an important step to be sure that the crust is chewy and somewhat crisp – not soggy)

Place the cauliflower in a mixing bowl.  Add egg, cheese and seasons.  Mix thoroughly and pat into a tight ball.  Line pizza pan with parchment paper.  Spray with nonstick cooking spray.  Firmly pat the cauliflower mixture so it forms a tight, ¼ inch thick crust in the shape you desire.

Bake in a 400 degree oven for 10 to 15 minutes until it becomes golden brown.  Remove from oven and add desired topping.  Return to the hot oven for an additional 5 to 8 minutes until the toppings are hot and cheese is bubbly. 

Let cool slightly for only 2 to 5 minutes before cutting and serving.  One head of cauliflower will make one 12 to 14 inch pizza.

Enjoy!
            
If you have comments or questions, you may place them in the comment section below.  We also welcome opportunities to share your recipes with our readers.  If you wish to share your recipes, you can email them to JLMarkerKitchens@gmail.com or in the comment section below. 
 
JLMarkerKitchens.com


Wednesday, August 17, 2016

Homemade Dinner Rolls

Do you love homemade dinner rolls?  When I cook a meal for my family or for a large holiday gathering, I love to make fresh baked homemade dinner rolls.   I love to watch everyone enjoy the freshly baked bread aroma when they enter the home.  It pleases me to see the expressions when they take the first bite of the warm roll with butter or apple butter on it.  Homemade dinner rolls are a beautiful and tasty enhancement to the delicious meal you have before them.

My cousin shared a nice family recipe which I am sharing with you.  Now, you, too, can feed your family some great freshly baked homemade dinner rolls.  Please note that this recipe will yield more than four dozen.

4 Tbps shortening
¾ C granulated sugar
1 ¼ tsp salt
2 eggs
2 C warm milk
1 C water
3 Pkgs of dry yeast (1 strip or 1 cake)
7 C flour

Cream shortening, sugar, salt and eggs.
Separately, add yeast to warm water, stir and let set. 
The next step is to heat the milk for one to two minutes in microwave. 
 
Add flour and knead the dough well. 
Be sure to mix well.
Add the shortening mixture, and yeast mixture to the warm milk.

Place the dough in a greased bowl and let it rise double in size.  Form the dough into rolls, and let rise and bake at 350 degrees for about 8-10 minutes.


Helpful Hints: 

            Warm Water:  Be sure your water is warm to the tough, a few degrees about room
             temperature and warm enough to dissolve the yeast.  Be careful that the water is not hot and              kills the active yeast which would causing the dough to NOT raise. 

             Warm Milk:  Same as the water.  Be sure that it is warm, not boiling hot, as it could kill
            the rising action of the yeast.

 If you have comments or questions, you may place them in the comment section below.  We also welcome opportunities to share your recipes with our readers.  If you wish to share your recipes, you can email them to JLMarkerKitchens@gmail.com or in the comment section below. 

JLMarkerKitchens.com

Tuesday, August 9, 2016

Did you know .... Kitchen Helpful Hints Part I


Sometimes we find the coolest and neatest information online or hear great kitchen helpful hints from our mothers, family and friends.  Here are just a few that I've come across.  Feel free to share these tips with your kids, or other family and friends.

 Did you know.....

1.      You should keep (store) your spices in cool, dark, places and not keep them above your stove.  The reason for this is because the humidity, light and heat will cause the herbs and spices to lose their flavor.


2.      If you are preparing a nice meal and/or dessert for a VIP (Very Important Person) like your boss, your pastor or similar, you may not want to make a new recipe.  They never seem to work out the first time.  Be sure you are creating a dinner that you know you have perfected before.


3.      To keep your pasta from getting mushy, be sure to cook it one (1) minute less than the package instructions and then finishing cooking it the rest of the way in the pan with sauce. 


4.      When you are cooking and realize that you need to add more oil to the pan, be sure to add it in a stream along the edges of the pan.  By doing so, by the time the oil gets to the food being prepared, the oil will be heated.


5.      Deep frying food is often times messy and doesn’t work the way you want, however, when placing the food in the cooking oil, you may want to hold each piece of food with long tongs as you add it to the oil. It should be held just below the oil’s service for a period of five (5) seconds before letting it go into the oil.  This will prevent the food item from sticking to the bottom of the pot or the other food in the oil.


There are more helpful hints where these came from and we will be sure to share in future “Did You Know…..Kitchen Help Hints” blogs in the near future. 

We welcome you to share your kitchen helpful hints with us in the comment section below.  We will recognize your submission in a future blog. 

JLMarkerKitchens.com


Tuesday, August 2, 2016

Watermelon Sticks and Slices

'Tis the season for watermelon.  Graduation parties, family reunions and summertime birthday celebrations often mean that watermelon will be included in the menu.  Whether by pot luck or by planned menu, you will find that watermelon slices will be sitting pretty on the table. 

How do you cut your watermelon?  There are some very simple ways and then again you can be very creative and carve the perfect design into the shell. 

Here are a few options from which to choose, but I have found that my favorite which is VERY EASY, is to create watermelon sticks rather than watermelon slices. 

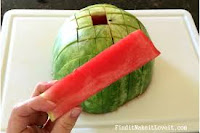
Make Watermelon Sticks  - perfect for kids and parties
You may want to view this video to the left showing the best way to cut watermelon sticks.  These are perfect for kids to handle.  Sometimes people just want a little piece that easy to eat.  These watermelon sticks are perfect for that, too. 

https://www.youtube.com/watch?v=7PLYOQbJgq0Watermelon ArtMaybe you want to try to be even more creative.  There are many videos and books out there to help you be the master at carving a watermelon and giving your guests a lot to talk about.  Carving a watermelon can be as easy or hard as you want it to be.  Check out the
video to the right and see what you can do. 

Come on, give it try!